Cloud is a big thing at the moment, and it seems cloud is here to stay. While organisations are continuously moving to cloud solutions some questions are being raised, especially questions regarding how to connect our current datasets and databases which are located on premise to my newly created applications which reside(s) in the cloud in a safe and secure manner .
Thankfully this question has an answer. IBM has addressed this concern elegantly by implementing a solution named the "IBM Secure Gateway for Blue-mix".
The Secure Gateway Service provides a quick, easy, and secure solution for connecting anything to anything. By deploying the light-weight and natively installed Secure Gateway Client, you can establish a secure, persistent connection between your environment and the cloud. Once this is complete, you can safely connect all of your applications and resources regardless of their location. For more information about the secure gateway service take a look here .
During the flow of this article we will describe the process of connecting IBM Streaming Analytics Service in the cloud to a local (on premise) DB2 Express-C installation (running in docker).
During the flow of this article we will describe the process of connecting IBM Streaming Analytics Service in the cloud to a local (on premise) DB2 Express-C installation (running in docker).
Prequisites:
- IBM Cloud (formerly known as blue-mix) account, don't have an account yet, here is the link to the registration page : Register to IBM cloud
- IBM DB2 Express-C developer community edition (docker image), here is the download link
- IBM Streams studio: IBM Streams quick start VM
Setting up the database (on premise):
After downloading the relevant docker image (i am using mac for the purpose of this article). Run the installer ("IBM_Db2_Developer_Community_Edition-1.1.3.dmg" for mac).
Make sure when running the docker image to use the defaults .
Make sure when running the docker image to use the defaults .
User : db2inst1
Password: db2inst1
When the installer finished go to your docker image manager (I am using kitematic for the purpose of this article), and click the exec button as illustrated by the image below:
The Docker image's terminal will open after a few seconds. Enter the following list of command one by one.
$su - db2inst1
$db2
$connect to sample
CREATE TABLE EVENTS(ID INTEGER NOT NULL,VALUE INTEGER NOT NULL)
Please take a look at the following screenshot to verify your actions and their results:
Creating the IBM Streams application:
Open the quick start virtual machine and then open the IBM Streams Studio. Import the SPL application which is located here into your Streams Studio workspace. Take a look at the image below to validate that all of the resources were imported as follows .
When the project has been imported change any properties within the code you might need note that host and port are submission time values, so no need to change them, build the project and create a sab (Streams Application Bundle) file. Save the sab file for later use, we will use it later during the flow of this article.
Creating the Secure Gateway
The Secure Gateway is the link between our application (sab) which we have built from code and will run on the Streaming Analytics service on the IBM cloud and the DB2 Express-c database which we have configured on your local machine .
Lets go ahead and create the Gateway service.
Go to the IBM Cloud (blue-mix) dashboard and click the "create resource" button, search for the string "gateway" and choose the "Secure gateway" under the platform section (see below).
Later, choose your region, organisation and space. Then click create . Then click the "add gateway" .
Afterwards click the "Add Gateway" then take all the defaults and click the "Add Gateway" button (see image below).
Next we will add an on-premise destination to push the events into .
Click the destinations tab --> click the "+" button --> choose "on-premise" --> next --> enter the IP of the machine running the docker image (the machine which binds the 50000 port, your machine basically) and port number 50000 --> next--> click next --> click next --> give the resource the name "PushToDb2" and then create (please follow the images).
If you see the red hand on your destination don't worry, all it means that there are no connected clients at the moment. During the next step we will connect the on premise client to the secure gateway .
Adding the secure gateway client
Click on the clients tab on the right --> click the "+" button --> click the "docker icon" --> copy the docker run command to your clipboard.
Open a terminal session on your machine and run the "docker run" command which you have copied earlier.Run the command (take a look at the screenshot below) .
When the command finishes, verify that the secure gateway client docker has been created on your docker manager , and it has reported that "The Secure Gateway tunnel is connected" (take a look at the image above) .
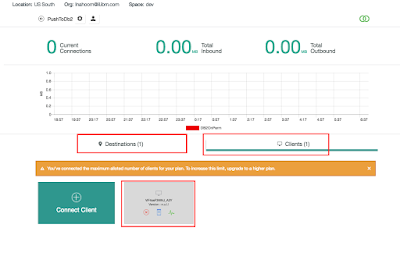
Once verified , take a second look at the Secure Gateway console and verify that you can see 1 destination and 1 client . And make sure that the client is now connected (verify with the image below).


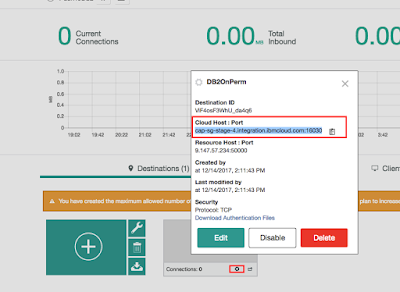
Go back to the Destinations tab again, click on the settings icon and copy the cloud host post combination (image below)

Configuring the ACL on the client side (on-premise)
In order for the client to be able to receive calls from outside we will need to add some hosts and ports to its ACL (Access Control List). Let's go to the clients terminal session and run the following commands:
acl allow <your_machine_host>:<your_db2_port>
acl allow <your_cloud_resource_host>:<your_cloud_resource_port>
Deploying the streams application on the streaming analytics service (in the cloud)
Go back to your blue-mix dashboard and start your streaming analytics instance, once started click the launch button to login to the system.
Click the play button to submit the application (sab file) and click submit . A window will open to get the submission time values required to connect to the remote system.
Enter your "cloud host" and "cloud port": into the submission time values prompt screen like in the screenshot below.
Note :make sure not to put your database host and port , but the gateway's host and port !
When the application has been submitted verify that the streams application is up and running and is pushing tuples to the database (Image below) :
When the application has been submitted verify that the streams application is up and running and is pushing tuples to the database (Image below) :
Run the following select command against the events table to verify that new tuples are arriving
SELECT COUNT(*) FROM EVENTS WITH UR
Congratulations, your cloud streaming analytics service and on premise database are now connected.


