Thursday, December 14, 2017

Connecting IBM Streaming analytics in the cloud with DB2 on premise


Cloud is a big thing at the moment,  and it seems cloud is here to stay.  While organisations are continuously moving to cloud solutions some questions are being raised, especially questions regarding how to connect our current datasets and databases which are located on premise to my newly created applications which reside(s) in the cloud in a safe and secure manner .

Thankfully this question has an answer. IBM has addressed this concern elegantly by implementing a solution named the "IBM Secure Gateway for Blue-mix". 


The Secure Gateway Service provides a quick, easy, and secure solution for connecting anything to anything. By deploying the light-weight and natively installed Secure Gateway Client, you can establish a secure, persistent connection between your environment and the cloud. Once this is complete, you can safely connect all of your applications and resources regardless of their location. For more information about the secure gateway service take a look here . 


During the flow of this article we will describe the process of connecting IBM Streaming Analytics Service in the cloud to a local (on premise) DB2 Express-C installation (running in docker). 

Here is the overall solution outline:


Prequisites:


Setting up the database (on premise):

After downloading the relevant docker image (i am using mac for the purpose of this article). Run the installer ("IBM_Db2_Developer_Community_Edition-1.1.3.dmg" for mac).

Make sure when running the docker image to use the defaults .

User : db2inst1
Password: db2inst1

When the installer finished go to your docker image manager (I am using kitematic for the purpose of this article), and click the exec button as illustrated by the image below:


The Docker image's terminal will open after a few seconds. Enter the following list of command one by one.

$su - db2inst1

$db2

$connect to sample

CREATE TABLE EVENTS(ID INTEGER NOT NULL,VALUE INTEGER NOT NULL)


Please take a look at the following screenshot to verify your actions and their results:


Creating the IBM Streams application:

Open the quick start virtual machine and then open the IBM Streams Studio. Import the SPL application which is located here into your Streams Studio workspace. Take a look at the image below to validate that all of the resources were imported as follows .


When the project has been imported change any properties within the code you might need note that host and port are submission time values, so no need to change them, build the project and create a sab (Streams Application Bundle) file. Save the sab file for later use, we will use it later during the flow of this article.

Creating the Secure Gateway

The Secure Gateway is the link between our application (sab) which we have built from code and will run on the Streaming Analytics service on the IBM cloud and the DB2 Express-c database which we have configured on your local machine .

Lets go ahead and create the Gateway service.

Go to the IBM Cloud (blue-mix) dashboard and click the "create resource" button, search for the string "gateway" and choose the "Secure gateway" under the platform section (see below).


Later, choose your region, organisation and space. Then click create . Then click the "add gateway" .

Afterwards click the "Add Gateway" then take all the defaults and click the "Add Gateway" button (see image below). 


Next we will add an on-premise destination to push the events into .

Click the destinations tab --> click the "+" button -->  choose "on-premise" --> next --> enter the IP of the machine running the docker image (the machine which binds the 50000 port, your machine basically) and port number 50000 --> next--> click next --> click next --> give the resource the name "PushToDb2"  and then create (please follow the images).


And the finished configuration should look like :


If you see the red hand on your destination don't worry, all it means that there are no connected clients at the moment. During the next step we will connect the on premise client to the secure gateway .

Adding the secure gateway client

Click on the clients tab on the right --> click the "+" button --> click the "docker icon" --> copy the docker run command to your clipboard.


Open a terminal session on your machine and run the "docker run" command  which you have copied earlier.Run the command (take a look at the screenshot below) .


When the command finishes, verify that the secure gateway client docker has been created on your docker manager , and it has reported that "The Secure Gateway tunnel is connected" (take a look at the image above) .

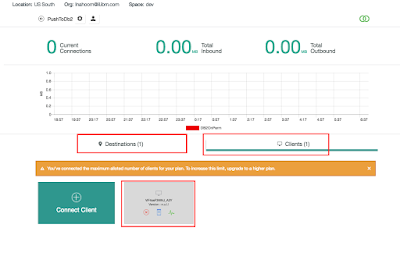
Once verified , take a second look at the Secure Gateway console and verify that you can see 1 destination and 1 client . And make sure that the client is now connected (verify with the image below).


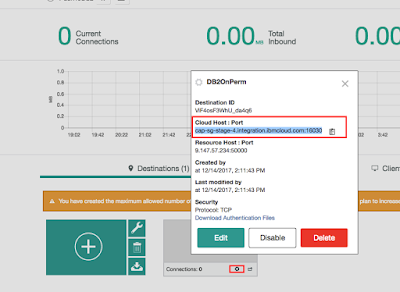
Go back to the Destinations tab again, click on the settings icon and copy the cloud host post combination (image below)


Configuring the ACL on the client side (on-premise)

In order for the client to be able to receive calls from outside we will need to add some hosts and ports to its ACL (Access Control List). Let's go to the clients terminal session and run the following commands:

acl allow <your_machine_host>:<your_db2_port>

acl allow <your_cloud_resource_host>:<your_cloud_resource_port> 

Take a look at the screenshot below for verification purposes:


Deploying the streams application on the streaming analytics service (in the cloud) 

Go back to your blue-mix dashboard and start your streaming analytics instance, once started click the launch button to login to the system.

Click the play button to submit the application (sab file) and click submit .  A window will open to get the submission time values required to connect to the remote system.

Enter your "cloud host" and "cloud port": into the submission time values prompt screen like in the screenshot below. 


Note :make sure not to put your database host and port , but the gateway's host and port !

When the application has been submitted verify that the streams application is up and running and is pushing tuples to the database (Image below) :


Run  the following select command against the events table to verify that new tuples are arriving 

SELECT COUNT(*) FROM EVENTS WITH UR 


Congratulations, your cloud streaming analytics service and on premise database are now connected.


Wednesday, November 29, 2017

Getting your UAA token to access IBM cloud services


It seems that lately i am having to deal with lots of security related issues at work (kerberos, IAM, UAA , bearer tokens etc ..) and to be more specific its more related to the authentication part .

If you need to access a service in IBM cloud (formerly known as blue-mix) which requires a UAA token either by username & password or using an API key authentication , both using java code you just got lucky !

This is an explanation of how to create an API key in IBM cloud: creating an API key


package ext.security;

import java.io.BufferedReader;
import java.io.InputStream;
import java.io.InputStreamReader;
import java.util.Scanner;

public class InputHandler  {

    public String getToken(Process process){
        String token = "" ;
        try {
           BufferedReader in = new BufferedReader(new InputStreamReader(process.getInputStream()));
           String line;
           StringBuilder builder = new StringBuilder();
           while ((line = in.readLine()) != null) {
               builder.append(line);
           }
           process.waitFor();
           in.close();
           token = builder.toString();
       }catch(Exception e){
           e.printStackTrace();
       }
       return token ;
    }
}


package ext.security;

import java.io.BufferedReader;
import java.io.IOException;
import java.io.InputStreamReader;
import java.util.List;
import java.util.logging.Logger;

public class UAATokenAccessor {

    private static final String TOKEN_PREFIX = "{“access_token”:“" ;
    private Logger logger = Logger.getLogger(this.getClass().getName());

    public String getUAATokenUsingUserNamePass(String username, String password, String UAAAuthURL) throws IOException,InterruptedException{
        logger.info("A request to get a UAA token was recieved") ;

        ProcessBuilder pb = new ProcessBuilder(
                "curl",
                "--request","POST",
                "--header","Authorization: Basic Y2Y6",
                "--header","Content-Type: application/x-www-form-urlencoded",
                "--data","grant_type=password&username="+username+"&password="+password,
                UAAAuthURL);
        System.out.println("!-------------------------------------------------!");

        List<String> command = pb.command();
        pb.redirectOutput(ProcessBuilder.Redirect.INHERIT);
        pb.redirectError(ProcessBuilder.Redirect.INHERIT);

        for(int i=0;i<command.size();i++){logger.info(command.get(i)+" ");
        }
        System.out.println("");
        Process process = pb.start();
        InputHandler handler = new InputHandler();
        String tokenRaw = handler.getToken(process);
        String token = formatToken(tokenRaw);
        logger.info("UAA Token returned : " + token);
        return token;
    }

    public String getUAATokenUsingAPiKey(String apiKey,String UAAAuthURL) throws IOException,InterruptedException{

        logger.info("A request to get a UAA token was received") ;

        ProcessBuilder pb = new ProcessBuilder(
                "curl",
                "--insecure",
                "--header","Content-Type: application/x-www-form-urlencoded;charset=utf-8",
                "--header","Accept: application/x-www-form-urlencoded;charset=utf-8",
                "--header","Authorization: Basic Y2Y6",
                "--data","grant_type=password&username=apikey&password=" + apiKey,
                UAAAuthURL);

        System.out.println("!-------------------------------------------------!");
        Process process = pb.start();
        InputHandler handler = new InputHandler();
        String tokenRaw = handler.getToken(process);
        String token = formatToken(tokenRaw);
        logger.info("UAA Token returned : " + token);
        return token;
    }

    private String formatToken(String tokenRaw){
        String token = null ;
        int tokenEnd = 0 ;
        String tokenRawNoPrefix = tokenRaw.substring(TOKEN_PREFIX.length(),tokenRaw.length());
        tokenEnd = tokenRawNoPrefix.indexOf(",");
        token = tokenRawNoPrefix.substring(0,tokenEnd-1);

        return token ;
    }
}

package ext.test;

import ext.security.UAATokenAccessor;
import org.junit.Test;

import java.util.logging.Logger;

public class UAATokenTest {

    private Logger logger = Logger.getLogger(this.getClass().getName());
    
    final static String bluemixUAATokenAuthURI = "https://login.ng.bluemix.net/UAALoginServerWAR/oauth/token" ;
    
    final static String prodApiKey= "<your-generated-apikey>" ;
    final static String bluemixUser = "<your_ibmid>";
    final static String bluemixPassword = "<your_ibmpassword>";

    @Test
    public void doTest(){

        doAPIAuthAuthentication(prodApiKey,bluemixUAATokenAuthURI,"Authentication with API key");

        doUserPassAuthentication(bluemixUser, bluemixPassword,bluemixUAATokenAuthURI,"Authentication with username and password");
    }

    public String doUserPassAuthentication(String user,String password, String authUri, String description){
        logger.info("testing:" + description);
        String authorization = null ;
        final UAATokenAccessor uaaAccessor = new UAATokenAccessor();
        try {
            authorization = uaaAccessor.getUAATokenUsingUserNamePass(user, password, authUri);
            logger.info("result for " + description + ": " +authorization);
        }catch(Exception e){
            e.printStackTrace();
        }
        return authorization ;
    }

    public String doAPIAuthAuthentication(String apiKey, String authURI, String description){
        logger.info("testing:" + description);

        String authorization = null ;
        try {

            final UAATokenAccessor uaaAccessor = new UAATokenAccessor();
            authorization = uaaAccessor.getUAATokenUsingAPiKey(apiKey, authURI);
            logger.info("result for " + description + ": " +authorization);
        }catch(Exception e){
            e.printStackTrace();;
        }

        return authorization ;
    }
}


Have fun !


Sunday, January 8, 2017

Handling application configuration files in apache Spark environments


Introduction

When programming an Apache Spark job the programmer will typically need to handle a number of configuration properties, these properties are not part of Spark’s configuration as they are “application configuration properties”.
Some examples of such properties could be:
  1. Communication protocol with the underlying storage such as hdfs, s3 etc.
  2. Various input and output paths
  3. Code configuration and constants
  4. And so on …

Typically, these will be used in a "spark-submit" job as input arguments to your main method, but implementing such a solution has some shortcomings, the command line gets longer and it’s much more complicated to handle multiple parameters, there is also no real “reuse” of the configuration types.
Using properties files on the other hand has some distinct advantages over submitting many input parameters to the job, these advantages will include a much “cleaner” interface to the "spark-submit" command and a real ability to re-use configuration files.

So, if we have decided to go with an approach to use properties files in our "spark-submit" job, Let us conclude what are the requirements of such a solution?
  1. We would like the properties file to be external to our application, most likely the file will reside somewhere on the master node and will be shipped later to the Spark nodes.
  2. The file itself should be read only once during startup and be constructed to a Scala object representation  
  3. The Properties object should be accessible to both Java and Scala in a very simple fashion, this requirement will come in handy providing we will want to use both java and Scala code in our application.
  4. The Properties object should be accessible to all the cluster nodes in an efficient manner. 


Solution outline


PropertiesHandler.scala 


import java.io.FileInputStream
import java.util.Properties
import org.apache.spark.Logging
import scala.collection.JavaConverters._


object PropertiesHandler extends Serializable with Logging {

 
private var cache: scala.collection.mutable.Map[String, String] = _;
 
private var propertiesFilePath:String = _ ;

 
//Gets the properties file as a scala mutable map
 
def init(propertiesFilePath:String): scala.collection.mutable.Map[String, String] = {
   
// buildBatch the property read only a single time
   
if (propertiesFilePath == null) {
      logInfo(
"A valid backend properties file was not provided, returning exception");
     
throw new NullPointerException();
    }
else {
     
this.propertiesFilePath = propertiesFilePath
     
//Properties backend initialized correctly
     
val x = new Properties()
     
//new FileInputStream(propertiesFilePath).
     
x.load(new FileInputStream(propertiesFilePath))
     
cache = x.asScala
     
cache
   
}
  }

 
def getProperty(key: String): String = {
   
if (cache == null && propertiesFilePath == null) {
      logInfo(
"PropertiesHandler object was not initialized successfully since backend properties file was not set .");
     
return null;
    }
   
cache.get(key).get
  }
}


Utilizing "Propertieshandler" from Scala


//initialize the properties with the properties file path
PropertiesHandler.init(configFilePath)
 
//Broadcasting the properties handler to all Spark nodes 
val broadcastProps = sc.broadcast(PropertiesHandler, "properties")

logInfo("Broadcast variable was created for properties distribution " )


//replace the local properties with the distributed one

val (propertiesHandler,_) = broadcastProps.value
 
//Accessing the properties on each of the nodes
val key = propertiesHandler.getProperty("myKey")
 

Utilizing "Propertieshandler" from Java


 public void doPropertyReaderTest( ) throws IOException {


    PropertiesHandler.init(
propertiesFilePath);
    SparkSession.setPropertiesHandler(PropertiesHandler$.
MODULE$);
    SparkSession.getPropertiesHandler();


//testing if the Properties file were loaded succesfully, no need to do           it in runtime

   
if(PropertiesHandler$.MODULE$ == null){
       
throw new IOException("Propeties were not loaded, failing test");
    }
else{
        System.
out.println("Properties loaded successfully, test successful");
    }

   
//everything loaded successfully .
   
String demoProperty = PropertiesHandler$.MODULE$.getProperty("general.app.name");
    System.
out.println("testing property named:'" + demoProperty +"',value =" + demoProperty);
}


Utilizing the properties file from a "spark-submit" call


The bold lettering in the "spark-submit" job command below signifies the path to the properties file which contains all the relevant configuration for the current "spark-submit" .


spark-submit --class com.ibm.twc.omniture.ingest.IngestJob --master yarn-client --name AdobeClickStreamAnalytics /home/biadmin/adobe_clickstream_analytics_2.10-1.0.0.jar /home/biadmin/omniture.properties 20150816


Final thoughts


The utilization of a solution based on a properties file(s) for the submission of your Spark jobs, enables you to implement a very clear configuration management utility for you Spark jobs. This solution can greatly reduce the amount of time and effort needed to support moving from one environment to another and implementing rapid changes within your code while improving the reuse of your configuration.
We have found that the techniques discussed on this blog to be useful in the projects that our team has deployed . 

I would like to personally thank Raanon reutlinger  and Leonid gorelik for their contribution and innovative ideas while designing this solution with me .